Upgrading A Server to Asymmetric Code: Difference between revisions
BubbleWrap (talk | contribs) mNo edit summary |
m 2 revisions imported: Importing Portal Corps Wiki pages and history - Feb 6, 2020 |
(No difference)
| |
Latest revision as of 11:02, 6 February 2020
This information is for users migrating an existing server to the new code. Entirely new servers with no pre-existing database can just install the code and go. Proceed to Generate Asset Files.
Switching to the new Asymmetric-enabled code requires a number of steps, it is not simply a case of installing the new code and clicking go. The code changes necessitate a matching DB change to prevent corruption of the costume database.
Preparation
On your existing server installation, login to any of your alts (ideally one on your first page) and ensure they are wearing a costume that is not in their first slot. Even numbers slots are best, so try wearing your second costume. This character will be the warning sign, as a failed update will cause them to appear corrupted. You can now shut the server down completely ready for the upgrade.
From this point forward, even when the instructions say to boot the server, DO NOT GO PAST CHARACTER SELECTION UNTIL EXPLICITLY TOLD TO. Entering the game will commit corrupt characters to the DB, making the corruption permanent.
Backup
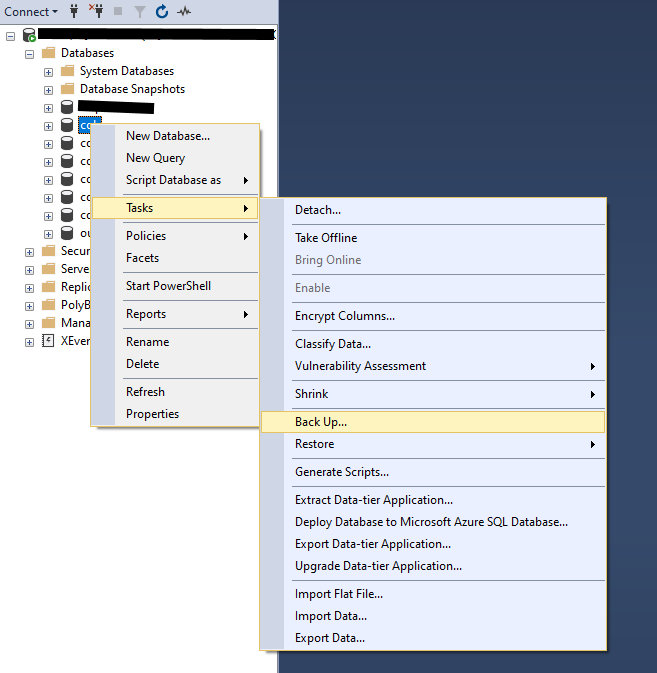
Make a complete backup of your database. In SQL Server Management Studio you do this by right clicking on each database in turn, going to Tasks and choosing Backup. A dialogue box will pop up telling you where the backup will be saved. Make a note of this just in case, then click OK.
Update Database
MAKE SURE YOU HAVE BACKED UP YOUR DATABASE BEFORE DOING THIS
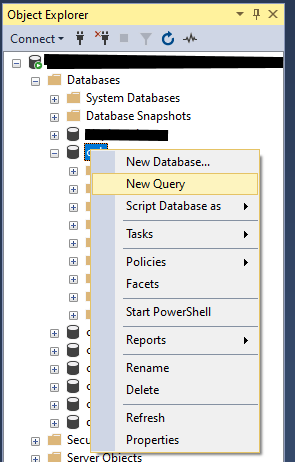
Run this SQL query on your database. In SQL Server Management Studio you do this by right clicking on the main CoH database (usually coh or cohdb or similar), and choosing New Query. A blank window will pop up and you can paste the code there.
You MUST ensure the first line of the script matches the name of your CoH database (so if you are using cohdb, change it to Use cohdb.dbo)
... SQL HERE ...
Update Code
Update your server to the new code. Compile as per normal. DO NOT INSTALL ANY ASYMMETRIC ASSET FILES YET
Test Run
Boot the server, ensure your test character's costume is displaying correctly. If it is not then STOP NOW and shut the server down, go back and ensure you have followed each previous step. If the problem persists, ask for help on the OuroDev Discord.
If the test character looks ok, quickly check there are no obvious issues with other characters, and if not then pick one and enter the game. Ensure the costume has loaded correctly, then zone to another map and check the costume is still correct. If your character cannot enter the game or loses the costume on zoning/logging out then you may have an attributes issue. If you don't know what this is and how to resolve it, ask for help on the OuroDev Discord.
Generate Asset Files
Skip this step if you are not using ModMaker, and generate your asset files using your preferred method.
Place all the mods you want to use in your ModMaker MODS directory. Ensure the base files are in the SOURCE directory. Run ModMaker to generate a set of asset files. These will be in the DEST folder, copy them to your bin making server. You must also copy the defs/ui/bodyparts.bp from the base folder to the bin server. ModMaker will not place this file in the DEST folder.
Build Asymmetric Bins
Using your generate data files, rebuild the bins using mapserver -verbose 2 -nosharedmemory. This should generate a new costume.bin, BodyParts.bin and product_catalog.bin. These should be placed in data/bin on both server and client (product_catalog may need to be in data/server/bin as well).
Generate Attributes
With the bins in place, generate attributes for your server by running mapserver -productionmode -templates
Final Test
Boot the server and ensure you can enter the game. If you attempt to load a costume file, it should tell you there are invalid left and right gloves, choose FIX and it will remove the gloves and let you proceed and you can re-apply the gloves using the separate left and right slots. Test a character with old-gloves (from before the upgrade who hasn't been edited), and one with asymmetric gloves - ensure you can enter the game and that costumes are not lost on zoning or logging out.
Note on Costume Files
The upgraded code loads and saves costume using the .v2costume extension. It can also load, but not save, .costume files. This means you can bring costumes from non-upgraded servers across after the upgrade, however you will need to adjust the gloves. You can identify old costumes in the costume list as the costume name will end with a period.

