Volume 2 Server Setup: Difference between revisions
From OuroDev
| Line 44: | Line 44: | ||
:: Copy all files from ''C:\CoH_Data\attributes'' and place them into ''C:\Ouroboros\data\server\db\templates''. | :: Copy all files from ''C:\CoH_Data\attributes'' and place them into ''C:\Ouroboros\data\server\db\templates''. | ||
: Open ''C:\Ouroboros\DBSchemas'' and execute all the .sql files in the directory. You may need to change the file path -- anywhere works. Drop old database references before if there are any. | : Open ''C:\Ouroboros\DBSchemas'' and execute all the .sql files in the directory. You may need to change the file path -- anywhere works. Drop old database references before if there are any. | ||
== Database setup == | |||
# You will need to choose a password for the database user. In these examples it will be "YOURL33TPASS!". | |||
# Launch SQL Server Management Studio from the start menu | |||
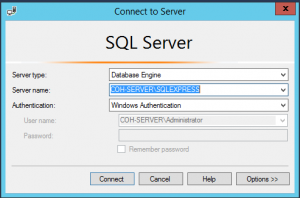
# Hit "Connect" on the screen that pops up, with default settings: [[File:SQL Connect.png|thumb|none]] | |||
# We need to enable the sa login so that server can login to the database. | |||
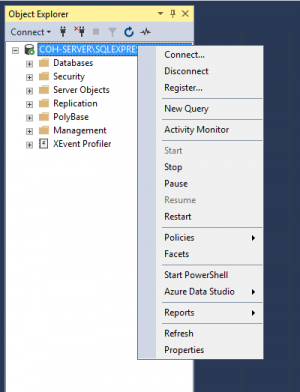
## If you look to the left panel you will see the object explorer and your connection. Right click it and select properties. [[File:SQL Properties.png|thumb|none]] | |||
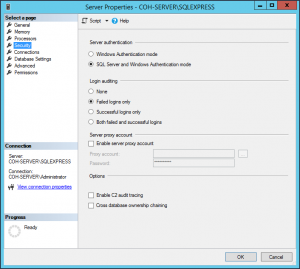
## When this window comes up hit Security to the left and enable "sql server and windows authentication". Then click ok. [[File:SQL Security.png|thumb|none]] | |||
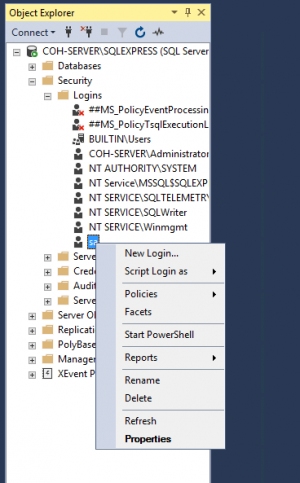
## In the same panel you used before navigate to Security -> Logins then right click and enter properties the sa user. [[File:SA Properties.png|thumb|none]] | |||
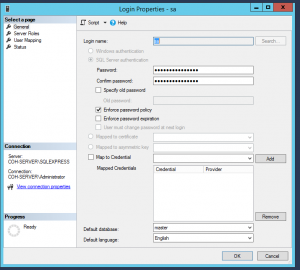
## In this window set the password to the same password you set back at step 4 [[File:Login Props.png|thumb|none]] | |||
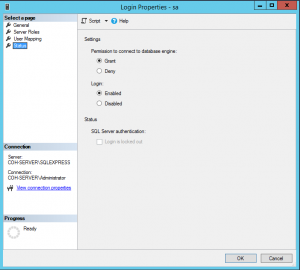
## Choose Status from the left panel in this same window and set login to enabled and hit ok. [[File:Login Status.png|thumb|none]] | |||
## Right click the connection in the object explorer again and click Restart. [[File:SQL Restart.png|thumb|none]] | |||
# Next we need to apply the schema for the databases which require this to be done manually (auction, auth, and chat) | |||
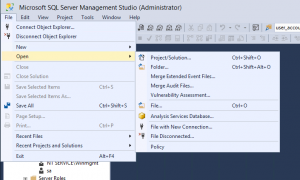
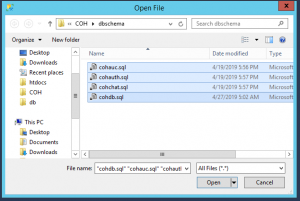
## Click File -> Open -> File, navigate to the dbschemas that you downloaded at the start, and select cohauc.sql [[File:SSMS File Open.png|thumb|none]] [[File:SSMS Open DBSchema.png|thumb|none]] | |||
## You will see a '''create database''' statement near the top of the file, with two lines that include a '''filename''' parameter. [[File:SSMS DBSchema SQL SRV STR.png|thumb|none]] | |||
## Set these to the directory where you want to create the database files. For this example, I have created a directory {{ms|C:\OuroborsDb}} and put the database there: | |||
#: <syntaxhighlight lang="SQL">( NAME = N'cohauc', FILENAME = N'C:\OuroborosDb\cohauc.mdf' , SIZE = 157440KB , MAXSIZE = UNLIMITED, FILEGROWTH = 1024KB )</syntaxhighlight> | |||
#: <syntaxhighlight lang="SQL">( NAME = N'cohauc_log', FILENAME = N'C:\OuroborosDb\cohauc_log.ldf' , SIZE = 353216KB , MAXSIZE = 2048GB , FILEGROWTH = 10%)</syntaxhighlight> | |||
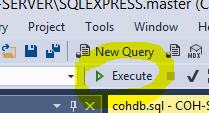
## Click the Execute button [[File:SSMS Execute.png|thumb|none]] | |||
## Repeat these steps for cohauth and cohchat. '''Do not use cohdb.sql''' | |||
== Server Configuration == | == Server Configuration == | ||
| Line 55: | Line 75: | ||
::; While you have servers.cfg and auction_server.cfg open. Change all the ips to 127.0.0.1. | ::; While you have servers.cfg and auction_server.cfg open. Change all the ips to 127.0.0.1. | ||
: Open up ODBC Data Sources (32-bit). | : Open up ODBC Data Sources (32-bit). | ||
:* Type 'ODBC' in Windows search, or run directly from C:\Windows\SysWOW64\odbcad32.exe | :* Type 'ODBC' in Windows search, or run directly from C:\Windows\SysWOW64\odbcad32.exe | ||
Revision as of 12:44, 8 June 2019
Required Software
- Ouroboros Volume 2 Binaries. For this guide, we will assume that you are installing them into C:\Ouroboros. You can either:
- Download a released version of Volume 2 (not yet available)
- Follow Volume 2 Build to compile it from source, then copy the contents of the bin directory to c:\Ouroboros
- Database schema definitions. For now, get them from https://git.ourodev.com/CoX/Source/src/tag/v2-i1.0.0/Assets/DBSchemas
- SQL Server 2012 or later (Express is good enough for development)
- SQL Server Management(SSMS)
- Download the Issue 24 client and data files - this is not the SCORE client/data.
- Download CoHDev_Source_Files_Current(Updated).zip.
- Download ServerData.7z.
Install SQL Server 2017 Express
- You can install SQL Server pretty much on the default settings.
- Select Basic under installation type:
- Agree to the EULA if you want to use SQL Server.
- Tell the server where to install files. I changed this for ease on my system.
- It should begin installing and eventually you should see "Install has completed successfully". Click close.
- Select Basic under installation type:


Install SQL Server Management(SSMS)
- You can install SQL Server Management on default settings.
- Select the location you'd like to install SSMS to. The default is fine.
- It will take awhile to install and you'll see a little progress bar letting you know whats going on
- Eventually it will ask you to reboot the system. Might as well as do that now.
- Select the location you'd like to install SSMS to. The default is fine.


Setup Server Files
- Create a directory in C:\Ouroboros called data.
- Open ServerData.7z and extract all files into C:\Ouroboros\data (the newly created directory).
- Open CoHDev_Source_Files_Current(Updated).zip.
- Extract "i24 Server and Client Piggs (extracted with CoHTools)" into C:\Ouroboros\data.
- Copy maps.db from "map.db (modified, working on current VS2010 build)" and place it in C:\Ouroboros\data\server\db, overwriting the old maps.db
- Copy the piggs folder from your i24 client directory and place them in C:\Ouroboros\. You should end up with C:\Ouroboros\piggs\ populated.
- Create a directory in your C: drive called "CoH_Data" and another directory inside that, called "attributes" (C:\CoH_Data\attributes).
- Run this in a command prompt:
cd Source\bin.\mapserver.exe -productionmode -templates
- Copy all files from C:\CoH_Data\attributes and place them into C:\Ouroboros\data\server\db\templates.
- Run this in a command prompt:
- Open C:\Ouroboros\DBSchemas and execute all the .sql files in the directory. You may need to change the file path -- anywhere works. Drop old database references before if there are any.
Database setup
- You will need to choose a password for the database user. In these examples it will be "YOURL33TPASS!".
- Launch SQL Server Management Studio from the start menu
- Hit "Connect" on the screen that pops up, with default settings:
- We need to enable the sa login so that server can login to the database.
- If you look to the left panel you will see the object explorer and your connection. Right click it and select properties.
- When this window comes up hit Security to the left and enable "sql server and windows authentication". Then click ok.
- In the same panel you used before navigate to Security -> Logins then right click and enter properties the sa user.
- In this window set the password to the same password you set back at step 4
- Choose Status from the left panel in this same window and set login to enabled and hit ok.
- Right click the connection in the object explorer again and click Restart.

- If you look to the left panel you will see the object explorer and your connection. Right click it and select properties.
- Next we need to apply the schema for the databases which require this to be done manually (auction, auth, and chat)
- Click File -> Open -> File, navigate to the dbschemas that you downloaded at the start, and select cohauc.sql
- You will see a create database statement near the top of the file, with two lines that include a filename parameter.

- Set these to the directory where you want to create the database files. For this example, I have created a directory
C:\OuroborsDband put the database there:
( NAME = N'cohauc', FILENAME = N'C:\OuroborosDb\cohauc.mdf' , SIZE = 157440KB , MAXSIZE = UNLIMITED, FILEGROWTH = 1024KB )
( NAME = N'cohauc_log', FILENAME = N'C:\OuroborosDb\cohauc_log.ldf' , SIZE = 353216KB , MAXSIZE = 2048GB , FILEGROWTH = 10%)
- Click the Execute button
- Repeat these steps for cohauth and cohchat. Do not use cohdb.sql
- Click File -> Open -> File, navigate to the dbschemas that you downloaded at the start, and select cohauc.sql


Server Configuration
- Navigate to C:\Ouroboros\data\server\db
- Open up auction_server.cfg(I25_auction_server.cfg), account_server.cfg(I25_account_server.cfg), chat_server.cfg(I25_chat_server.cfg), and servers.cfg(I25_Server.cfg).
- You can change the password to whatever you would like. For this example I will be just using "YOURL33TPASS!".
- You will see something like this.
SqlLogin "DRIVER={SQL Server Native Client 11.0};Server=NS319069\SCORE;Uid=sa;Pwd=FinallyFree!;"
- Change this to
SqlLogin "DRIVER={SQL Server Native Client 11.0};Server=localhost\SQLEXPRESS;Uid=sa;Pwd=YOURL33TPASS!;"
- While you have servers.cfg and auction_server.cfg open. Change all the ips to 127.0.0.1.
- You can change the password to whatever you would like. For this example I will be just using "YOURL33TPASS!".
- Open up ODBC Data Sources (32-bit).
- Type 'ODBC' in Windows search, or run directly from C:\Windows\SysWOW64\odbcad32.exe
- Do NOT use 64-bit!
- Click File DSN then click add to the right.
- Choose ODBC Driver 17 for SQL Server. Click Next.
- Enter AuthDB into the box and hit next then finish.
- It will then say something like ‘Which SQL Server would you like to connect to?’
- Type localhost\SQLEXPRESS and hit next.
- Type localhost\SQLEXPRESS and hit next.
- Choose with SQL Auth enter sa into username and the password you use previously.
- Tick choose change default database to and select cohauth and hit next.
- After this hit finish then ‘Test Data source’ this will test the auth database connection to your main database if it successful congrats :D


Port Forwards
- TCP Ports
- Port 11228
- UDP Ports
- Ports 18717 through 18917
Setup Internet Facing Server
- Patching the DBServer allows it to return the correct IP address for MapServers to the client.
- dbserver.exe needs to be patched to read its external IP from a config file, a patched version can be downloaded from here or from the following magnet link
dbserver.exe [MD5] c66842d15bc94f6b6b2a282331c01e3f | dbserver.exe [SHA1] 9ba7c9774de2f75cd72efb604c44c3a86cbd24eb
- From SQL Sever Manager Studio(SSMS) run the query below.
INSERT INTO cohauth.dbo.server (id, name, ip, inner_ip, ageLimit, pk_flag, server_group_id) VALUES (1, 'ShardName', 'Public IP', '127.0.0.1', 0, 0, 1);
- Replace the existing dbserver.exe with the patched one and add the RouteIp line to servers.cfg with your server's public IP.
RouteIp YOURPUBLICIPADDRESS
Setup TurnstileServer
- Making the changes below will put your server into "production" mode. This will require things like mission_server.cfg to be created.
- This can be avoided by deleting texts.pigg from the server's piggs\ directory
- First make sure your turnstile_server.cfg is correct. Below you'll find an example.
- Example turnstile_server.cfg
-
DbServer LAN WAN 7000 ShardName ShardID ShardAuthID
DbServer 127.0.0.1 127.0.0.1 7000 Paragon 1 1
- Example mission_server.cfg
-
Shard NAME WAN REGION
Shard Paragon 127.0.0.1 1
- -patchdir score -patchversion 2400.201208211101.1 -auth VMIPGOESHERE -console
Setup QueueServer
- Queueserver may cause client disconnects and crashes on server selection, these issues are being looked into.
- Add the following line as a new Server in I25 loadBalanceShardSpecific.cfg, where
LANIPis the local network IP of the dbserverCommand "queueserver.exe -db LANIP"
- Additionally, add or change the following lines in I25 Servers.cfg, where
MaxPlayersis the number of logged in accounts you want to allow
UseQueueServer 1
MaxPlayers 100
- Finally,
WaitingUserLimitin etc\config.txt controls the maximum number of players to allow into the queueWaitingUserLimit = 100
Launch Server
- Start DBServer.exe and then Launcher.exe. This can be done simply by double clicking on them.
- You could also use a .bat file to start everything up and in the correct order.
- The below is an example bat file to launch the DBServer, Launcher, and finally the Client.
@echo off
echo Starting DB Server
START c:\Ouroboros\dbserver.exe
TIMEOUT 2
echo Starting Launcher Server
START c:\Ouroboros\launcher.exe
TIMEOUT 2
echo Starting Chat Server
START c:\Ouroboros\ChatServer.exe -noreserved
TIMEOUT 2
echo Everything should be launched! Go enjoy CoH.