Volume 2 Server Setup: Difference between revisions
| Line 81: | Line 81: | ||
Then press 'Execute'. | Then press 'Execute'. | ||
You will also want to create an account so that you can test connecting to the database. For now, use the instructions in [[I25_FAQ#How_do_I_create_an_account.3F]] | |||
== Server database connection configuration == | == Server database connection configuration == | ||
Revision as of 17:11, 8 June 2019
Required Software
- Ouroboros Volume 2 Binaries. For this guide, we will assume that you are installing them into C:\Ouroboros. You can either:
- Download a released version of Volume 2 (not yet available)
- Follow Volume 2 Build to compile it from source, then copy the contents of the bin directory to c:\Ouroboros
- Database schema definitions. For now, get them from https://git.ourodev.com/CoX/Source/src/tag/v2-i1.0.0/Assets/DBSchemas
- Sample config files. For now, get them from https://git.ourodev.com/CoX/Source/src/tag/v2-i1.0.0/Assets/ConfigFiles
- SQL Server 2012 or later (Express is good enough for development)
- SQL Server Management(SSMS)
- Download the Issue 24 client and data files - this is not the SCORE client/data.
- Download CoHDev_Source_Files_Current(Updated).zip.
- Download ServerData.7z.
Install SQL Server 2017 Express
- You can install SQL Server pretty much on the default settings.
- Select Basic under installation type:
- Agree to the EULA if you want to use SQL Server.
- Tell the server where to install files. I changed this for ease on my system.
- It should begin installing and eventually you should see "Install has completed successfully". Click close.
- Select Basic under installation type:


Install SQL Server Management(SSMS)
- You can install SQL Server Management on default settings.
- Select the location you'd like to install SSMS to. The default is fine.
- It will take awhile to install and you'll see a little progress bar letting you know whats going on
- Eventually it will ask you to reboot the system. Might as well as do that now.
- Select the location you'd like to install SSMS to. The default is fine.


Setup Server Files
- Create a directory in C:\Ouroboros called data.
- Open ServerData.7z and extract all files into C:\Ouroboros\data (the newly created directory).
- Open CoHDev_Source_Files_Current(Updated).zip.
- Extract "i24 Server and Client Piggs (extracted with CoHTools)" into C:\Ouroboros\data.
- Copy maps.db from "map.db (modified, working on current VS2010 build)" and place it in C:\Ouroboros\data\server\db, overwriting the old maps.db
- Copy the piggs folder from your i24 client directory and place them in C:\Ouroboros\. You should end up with C:\Ouroboros\piggs\ populated.
- Create a directory in your C: drive called "CoH_Data" and another directory inside that, called "attributes" (C:\CoH_Data\attributes).
- Run this in a command prompt:
cd c:\Ouroboros.\mapserver.exe -productionmode -templates
- Run this in a command prompt:
- Copy all files from C:\CoH_Data\attributes and place them into C:\Ouroboros\data\server\db\templates.
- If you didn't get them from a downloaded release, copy all sample config files from Source/Assets/ConfigFiles into c:\Ouroboros
Database setup
- You will need to choose a password for the database user. In these examples it will be "YOURL33TPASS!".
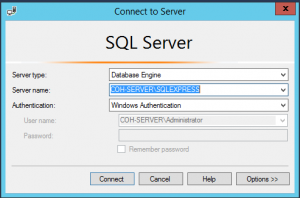
- Launch SQL Server Management Studio from the start menu
- Hit "Connect" on the screen that pops up, with default settings:
- We need to enable the sa login so that server can login to the database.
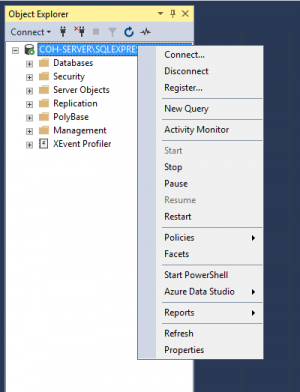
- If you look to the left panel you will see the object explorer and your connection. Right click it and select properties.
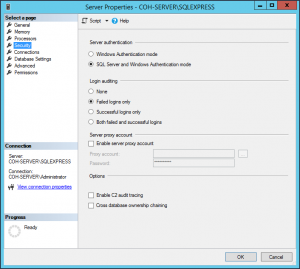
- When this window comes up hit Security to the left and enable "sql server and windows authentication". Then click ok.
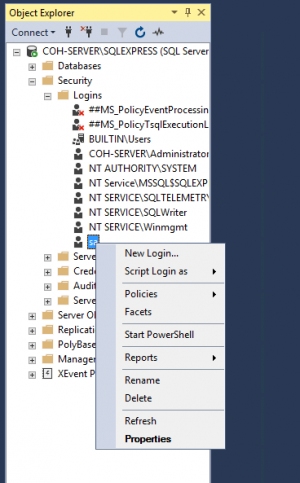
- In the same panel you used before navigate to Security -> Logins then right click and enter properties the sa user.
- In this window set the password to the same password you set back at step 4
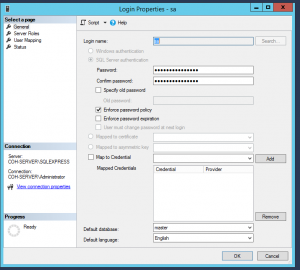
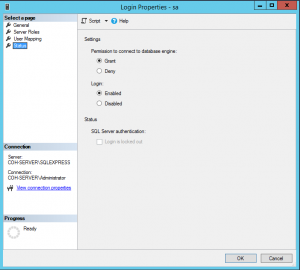
- Choose Status from the left panel in this same window and set login to enabled and hit ok.
- Right click the connection in the object explorer again and click Restart.

- If you look to the left panel you will see the object explorer and your connection. Right click it and select properties.
- Next we need to apply the schema for the databases which require this to be done manually (account, auction, auth, and chat)
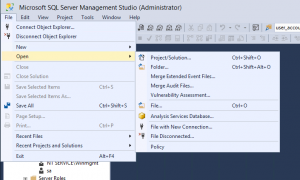
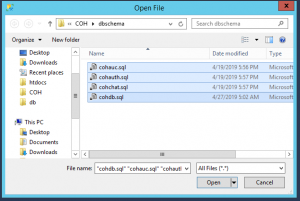
- Click File -> Open -> File, navigate to the dbschemas that you downloaded at the start, and select cohauc.sql
- You will see a create database statement near the top of the file, with two lines that include a filename parameter.

- Delete these lines, so that the statement is just:
CREATE DATABASE [cohauc]
- Click the Execute button
- Repeat these steps for cohacc.sql, cohauth.sql and cohchat.sql. Do not use cohdb.sql
- Click File -> Open -> File, navigate to the dbschemas that you downloaded at the start, and select cohauc.sql


Initial database entries
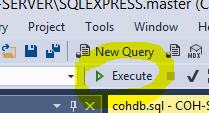
Each dbserver instance is a "shard". This needs to be manually added to authserver. In SQL Server Management Studio, expand "Databases", then right click on cohauth and select "New Query" from the menu. Several pieces of data are needed for this.
- The IP address which clients will use to connect to your server. In this example, we will use 1.2.3.4
- The source IP from which dbserver will connect to authserver. In this example, we will use 127.0.0.1
- The shard name that you will use for dbserver. This should match the table in I25_FAQ#How_come_my_server_says_.22Paragon.22_and_how_do_I_change_it.3F and the shard ID configured in the config files. In this example we will use Paragon.
- The auth shard number that you are using in turnstile_server.cfg. By default this is 1.
In the file that it creates, enter:
INSERT INTO cohauth.dbo.server (id, name, ip, inner_ip, ageLimit, pk_flag, server_group_id) VALUES (1, 'Paragon', '1.2.3.4', '127.0.0.1', 0, 0, 1);
INSERT INTO cohauth.dbo.worldstatus (idx, status) VALUES (1, 0);
Then press 'Execute'.
You will also want to create an account so that you can test connecting to the database. For now, use the instructions in I25_FAQ#How_do_I_create_an_account.3F
Server database connection configuration
Navigate to C:\Ouroboros\data\server\db. In each of the following files, look for an SqlLogin line, and change the Pwd= value to your password. Using our example YOURL33TPASS!:
SqlLogin "DRIVER={SQL Server Native Client 11.0};Server=localhost\SQLEXPRESS;Uid=sa;Pwd=YOURL33TPASS!;"
- account_server.cfg
- auction_server.cfg
- chat_server.cfg
- servers.cfg
In servers.cfg, also fix SqlInit to be:
SqlInit "create database cohdb;"
For authserver, we have to configure the connection via ODBC data sources.
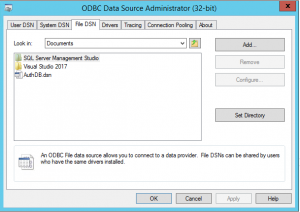
- Launch "ODBC Data Sources (32-bit)" from the start menu, or run directly from C:\Windows\SysWOW64\odbcad32.exe. (Do not use the 64-bit version)
- Click File DSN then click add to the right.
- Choose ODBC Driver 17 for SQL Server.
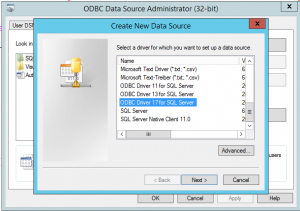
- Click Next.
- Enter AuthDB into the box
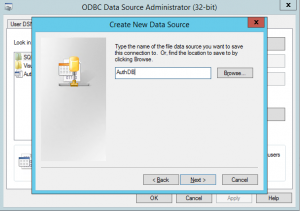
- Click Next, then Finish.
- One of the boxes on the next page will say "Which SQL Server do you want to connect to?". Type localhost\SQLEXPRESS
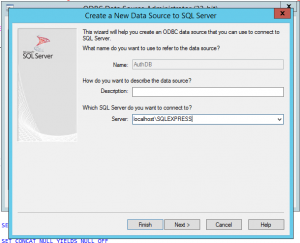
- Click Next
- Choose "With SQL Server authentication using a login ID and password entered by the user". Enter "sa" for the username, and the password that you chose:
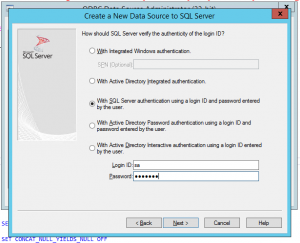
- Click Next
- Enable "Change the default database to" and select "cohauth".
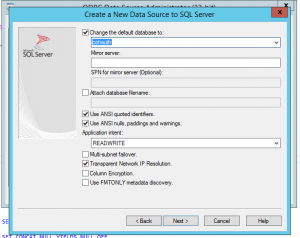
- Click Next
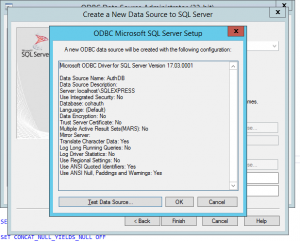
- Default settings are fine on the last page
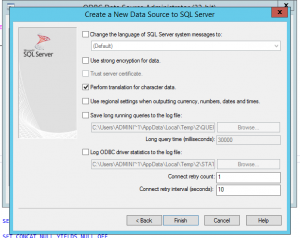
- Click Finish
- A box will appear with the settings you have selected. Click "Test Data Source"
- You should see "TESTS COMPLETED SUCCESSFULLY!" in the output. If not, go back and check your settings.
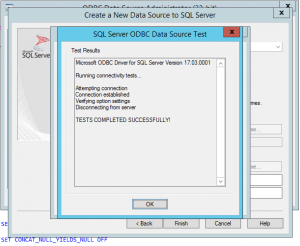
- Click OK, then OK again.


Then we have to enter the username and password again into authserver itself. Start authserver.exe, and the first time that you run it, this window will appear. Enter "sa" and the password that you chose:

This username and password is saved in the registry key HKEY_CURRENT_USER\Software\NCSoft\GLOBALAUTH
Launch Server
The following servers need to be manually started, in this order:
- authserver.exe
- dbserver.exe
- launcher.exe
The rest of the servers are started by loadBalanceShardSpecific.cfg.